 |

|
|
|
|
|
Support | |
|
How to install RAID driver on RefleXion XPC during Windows 2000 or Windows XP installation?
In order to install Windows 2000 or Windows XP RAID driver on RefleXion, floppy drive (or USB floppy drive) and floppy disk with RAID driver is essential
In order to install Windows 2000 or Windows XP RAID driver on RefleXion, floppy drive (or USB floppy drive) and floppy disk with RAID driver is essential.
Before you start you will need to do the following (create a Intel RAID Driver Floppy Disk or download the driver from here and extract/UnZip into a Floppy Disk directly):
- On a system running Windows, insert Motherboard Driver CD.
- Insert a blank floppy diskette into the floppy drive.
- Double-click on the D:\Intel\Raid\F6 install\F6 install.exe and answer all prompts presented, if your CD ROM Driver's label is D.
- When installation is complete, your floppy should contain the following files: iaStor.cat, iaStor.inf, iaStor.cat, License.txt, readme.txt and TXTSETUP.oem.
A: Using floppy drive:
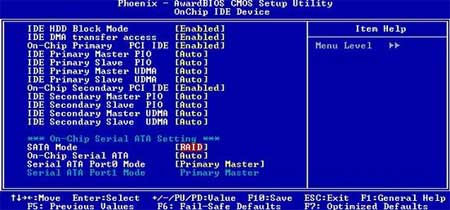
- Go into BIOS setting to adjust SATA in RAID Mode.
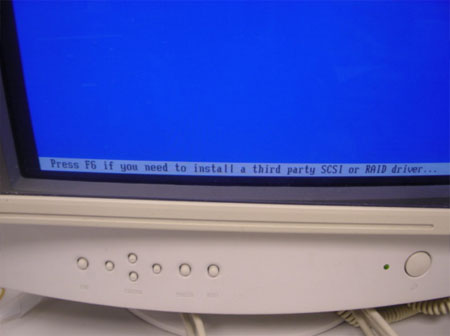
- Install Windows, press F6 function key when Raid setup message string come up.
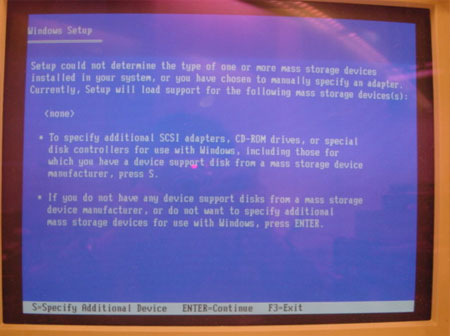
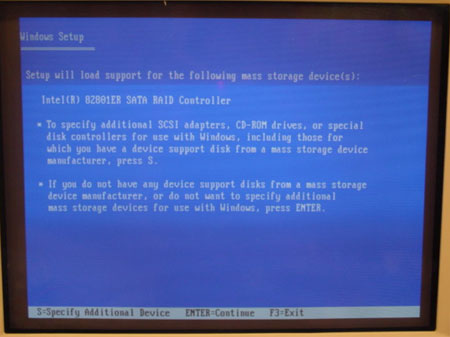
- Press S key to select RAID driver.
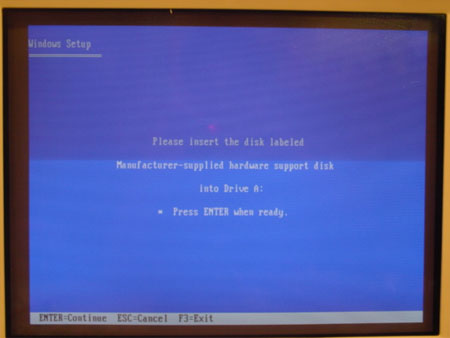
- Insert the floppy disk you just made into the floppy drive.
- Select the driver for your operating system.
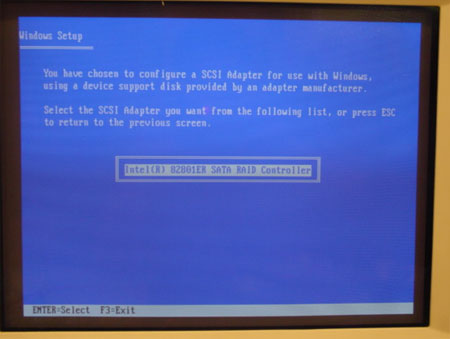
- After the driver is selected. Press Enter to continue installing Windows.
B: Using USB floppy drive:
- Go into BIOS setting to adjust SATA in RAID Mode.

- Make sure the Drive A is [None].

- Install Windows, press F6 function key when Raid setup message string come up.

- Press S key to select RAID driver.

- Insert the floppy disk you just made into the USB floppy drive.

- Select the driver for your operating system.

- After the driver is selected. Press Enter to continue installing Windows.
 |
|
|
| |
|
 |
|
|
|
|
|
|
|
| Búsqueda |
|
|
|
|
|
|
| Shuttle Newsletter |
|
|
|
|
|
Sea una fuente comercial de Shuttle |
|

¿Usted es revendedor y posee un local comercial y/o una tienda online?
¿Vende productos Shuttle? ¿Quiere aparecer en el listado de fuentes
comerciales oficiales? Entónces regístrese en el programa de reventas de
Shuttle y así podrá llegar a ser una fuente comercial oficial de
Shuttle
 | |
|
|
 |
| El boletín informativo de Shuttle le informa sobre todas las novedades en torno a Shuttle. | |
|
|
|
|