Caution: The current Shuttle website is located here: http://www.shuttle.com
This website includes backup data for products until September 2004.
 
 
Products Support Glossary
Print
 
HomeProductsXPCSB61G2/V3Info/FAQRAID installation


XPC SB61G2 / SB61G2V3

Subchapters: Specification | Accessories | RefleXion | Mainboard FB61 | Download | Info/FAQ | Images | Press |


  • Mini aluminum barebone system
  • Socket 478 supports 800/533/400FSB
    and Hyper-Threading
  • New: SB61G2V3 supports Prescott
  • Chipset: Intel 865G / ICH5
  • Low noise with ICE-Heatpipe cooling
  • Network connector: 100/10 MBit
  • 1x PCI, 1x AGP (8X), 2x Dual Channel DDR400/333/266/200 memory,
    8x USB 2.0, 2x Firewire
  • 6-channel audio with  SPDIF in/out
  • 2x Serial ATA connectors onboard
  • New: SB61G2V3 with 250W Silent-X Power Supply


Frequently asked questions (FAQ)

Subchapters: Related Links | SB61G2/V3 Versions | Full System Configuration | No boot after overclocking? | Dual Channel | Full system configuration | No boot after overclocking? | Monitoring tools | Install onto C: drive | RAID installation | Hardware compatibility |


How to install RAID driver on RefleXion XPC during Windows 2000 or Windows XP installation?

In order to install Windows 2000 or Windows XP RAID driver on RefleXion XPC, floppy drive (or USB floppy drive) and floppy disk with RAID driver is essential. Before you start you will need to do the following (create a Intel RAID Driver Floppy Disk):

  1. On a system running Windows, insert Motherboard Driver CD.
  2. Insert a blank floppy diskette into the floppy drive.
  3. Double-click on the D:\Intel\Raid\F6 install\F6 install.exe and answer all prompts presented, if your CD ROM Driver’s label is D.
  4. When installation is complete, your floppy should contain the following files: iaStor.cat, iaStor.inf, iaStor.cat, License.txt, readme.txt and TXTSETUP.oem.

Using USB floppy drive:
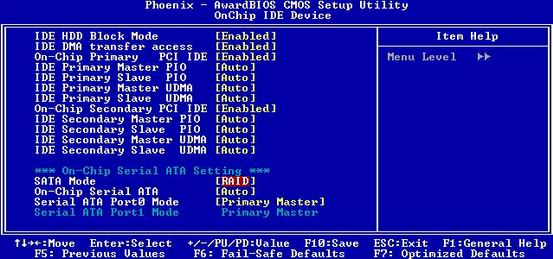
a-1: Go into BIOS setting to adjust SATA in RAID Mode.

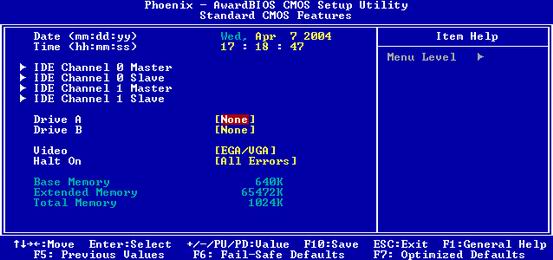
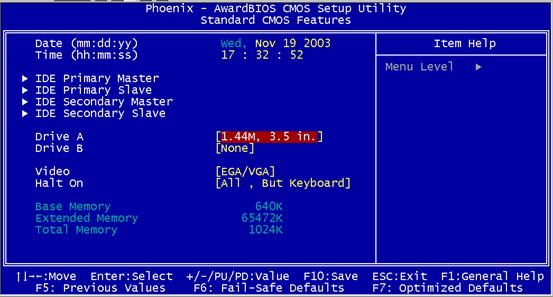
a-2: Make sure the Drive A is [None].

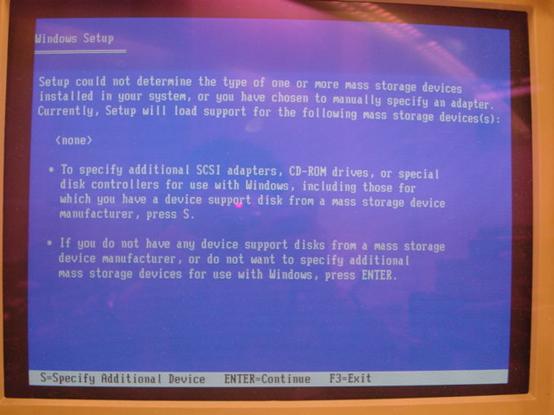
a-3: Install Windows, press F6 function key when Raid setup message string come up.

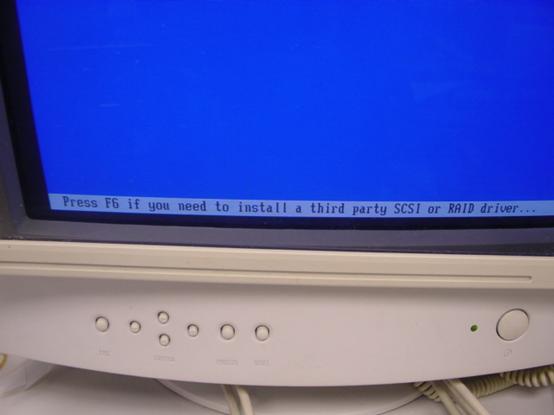
a-4: Press S key to select RAID driver.

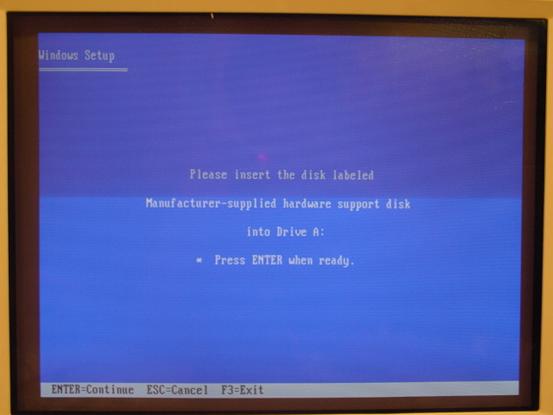
a-5: Insert the floppy disk you just made into the USB floppy drive.

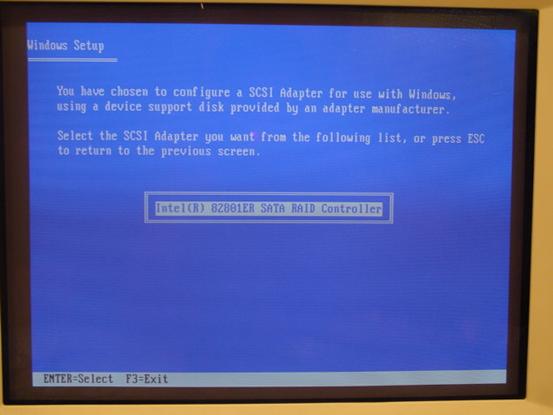
a-6: Select the driver for your operating system.

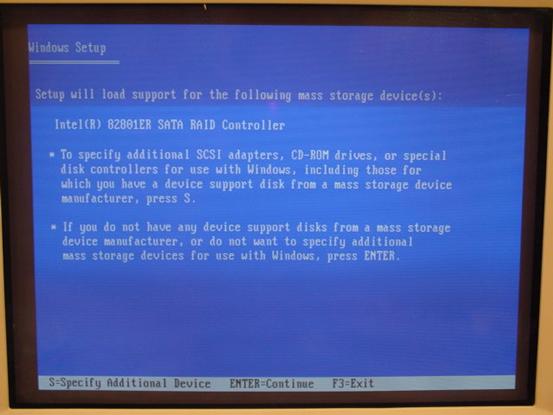
a-7: After the driver is selected. Press Enter to continue installing Windows.

B: Using floppy drive:
b-1: Go into BIOS setting to adjust SATA in RAID Mode.

b-2: Enable Drive A.

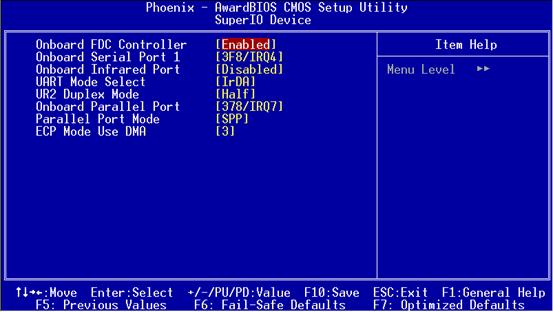
b-3: Enable Onboard FDC Controller.

b-4: Install Windows, press F6 function key when Raid setup message string come up.

b-5: Press S key to select RAID driver.

b-6: Insert the floppy disk you just made into the floppy drive.

b-7: Select the driver for your operating system.

b-8: After the driver is selected. Press Enter to continue installing Windows.


  Navigation
Home
Products
XPC
SB61G2/V3
Info/FAQ
Related Links
SB61G2/V3 Versions
Full System Configuration
No boot after overclocking?
Dual Channel
Full system configuration
No boot after overclocking?
Monitoring tools
Install onto C: drive
RAID installation
Hardware compatibility

Shuttle Computer - European Headquarters +++ Disclaimer +++ Last update: 30.4.2008