
|
Caution: The current Shuttle website
is located here: http://www.shuttle.com
This website includes backup data for products until September 2004. |
| Products | Support | Glossary |
|
|||||||||||||||
| Subchapters: Specification | Info/FAQ | Download | Press | | |||||||||||||||
|
|
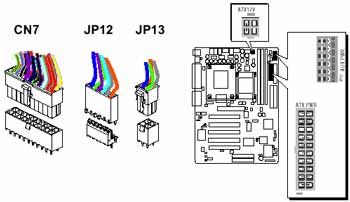
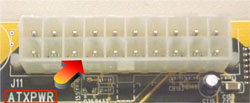 | This P4 mainboard uses 20-pin Pentium 4 standard ATX power header (connect to CN7) |
 | Connect 6-pin Aux VccNcc3 ATX power supply header to JP12 |
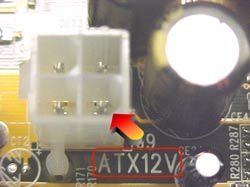 | Connect 2*2-pin + 12VPC ATX power supply header to JP13 |
The ATX power connector is directional and will not go in unless the guides match perfectly making sure that pin#1 is properly positioned. Make sure that the latch of the ATX power connector clicks into place. The power supply must be supplied to ACPI +5V standby power and at least 720mA. Also make sure your P4 power supply have enough power for higher speed processor installed. Please don't connect the power connectors to the mainboard until all other H/W devices has been installed.
 How do I enable Line-in audio function?
For standard AC'97 codec 2-channel onboard audio sound, the audio port connectors on the back panel are :
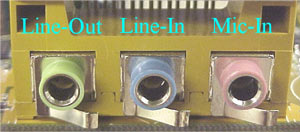
AB30/R uses build-in C-media 5.1 channel audio, and utilizes the Line-In port connector as Rear Speaker Out function. If you wish to use Line-In function, double click the C-Media sound mixer on the task bar and select "Advanced" Button. Then you can switch to 2 speakers, the Line-In function will then appear in the mixer in audio control panel.
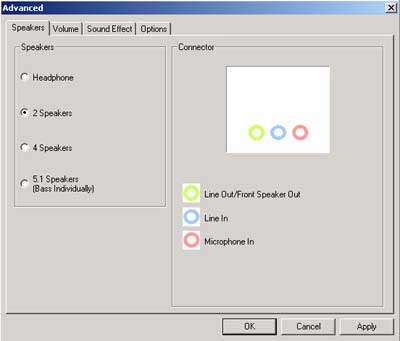
| To use 5.1 channel sound, apart from select "5.1 speakers (Bass Individually)" to switch to 5.1 channel, Audio Bass/Center-Out header is required to connect to jumper JP18, attached to bass/center amplified speaker. |  |
SiS 305 AGP card may damage the mainboard
When I use AB30/R (Intel i845 chipset) with SiS 305 AGP card, it caused damage to the mainboard. And if replaced with other known good AGP card the mainboard is dead. Why?
Please note that all 3.3V VGA cards should not use Intel i845 & i850 chipsets based motherboards! Intel i845 & i850 chipset only supports 1.5V graphics card (regardless of 2X or 4X). There is a voltage difference between AGP 2X and AGP 4X cards, and when you use AGP 2X AGP card the system might be damaged. Intel 845/850 chipset only supports 1.5V signaling AGP cards and the AGP slot on AB30/R has 1.5V key in it which complies with the AGP specification in order to prevent a 3.3V AGP card from being plugged in. However, some AGP graphics cards such as SiS305 chipset based VGA cards, though operate at only 3.3V signaling level, were notched at the 1.5V key on the golden-finger interface. That is, the AB30/R mainboard (or any other P4 i845/i850 chipset based mb) will be permanently damaged as soon as the system is powered up with such AGP card (refer to first diagram below).
| SiS 305, AGP 2X, 3.3V | 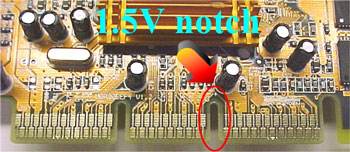 |
Can I use adhesive thermal silicone gel on P4 CPU die?
Adhesive thermal silicone gel such as Shin-Etsu Silicone will set after about 6 hours and form a strong bond between the heatsink and CPU die or other applied surfaces (eg. memory module, chipsets). This type of adhesive thermal compound is strongly not recommended to use on P4 Socket 423/478 CPU die. Since fan heatsink will stick strongly to the P4 CPU die and due to P4 Socket 423/478 ZIF socket structural design, upon removal of the heatsink will force P4 CPU to break apart from the ZIF socket thus damaging both pins on P4 CPU and ZIF socket. Please use non-adhesive thermal compound for P4 CPU only to avoid any damage done to the ZIF socket and P4 CPU.
Why cannot use 4 HDDs with RAID O (striping) or RAID 1 (mirroring) function on AB30R?
RAID 0 or RAID 1 function is only supported by the master channel of Promise ATA RAID (Promise PDC20265R chip). The HDD connects to the slave channel of Promise ATA RAID are to be as ATA HDD.
How do I install RAID devices driver during new Windows 2000/XP installation?
Before installing Windows 2000/XP, please extract the Promise IDE RAID driver from our download page to an empty floppy disk. Follow the following procedure to install RAID driver during the initial OS install setup :
1. Boot up with Win2000/XP CD
2. The message " Press F6 if you need to install a third party SCSI or RAID driver..." will appear at the bottom of the initial OS setup screen. Press <F6> to install RAID driver.
3. When the "Windows 2000/XP Setup" window is generated, press "S" to specify an Additional Devices.
4. Press "O" to select "Other" and press the <Enter> key.
5. Insert the Windows 2000/XP RAID driver floppy disk in drive A: and press <Enter> key.
6. Follow the setup menu.
7. If you need to specify any additional devices to be installed, do so at this time.
8. Once all RAID/SCSI devices are specified and respective driver installed continue with Win2000/XP installation.
Download AB30
Download links:
- BIOS Info: do not run the EXE-file under Windows/DOS-Box!
- Bios-Update AB30S02H (Mainboard AB30/AB30R) as ZIP file
- Bios-Update AB30S02I (Mainboard AB30/AB30R) start under Real DOS (not under Windows or DOS-Box)
- Bios History (Mainboard AB30/AB30R)
- Performance-Bios-Update AB309027 (Mainboard AB30) on your own risk!
- Promise FastTrak RAID Drivers for Win9x/ME/NT/2000,XP (210kB)
- Audio Driver for Win ME/2000/XP - 2681kB (AE25/R, AB30/R, AB40/R)
- Audio Driver for Win 95/98 - 1811kB (AE25/R, AB30/R, AB40/R)
- Audio Driver for Win NT4 - 64kB (AE25/R, AB30/R, AB40/R)
- Audio Driver for Linux - 218kB (AE25/R, AB30/R, AB40/R)
- Audio Driver for DOS - 51kB (AE25/R, AB30/R, AB40/R)
- Intel(R) INF Installation Utility Driver Page
- Motherboard Monitor Software (Freeware)
- English Manual AB30 (PDF, 2146kB)
- Promise Raid Controller Manual (PDF, 757kB)
- Download the FREE Acrobat Reader Software
| Navigation |
![]()
Shuttle Computer - European Headquarters +++ Disclaimer +++ Last update: 30.4.2008